Product Description
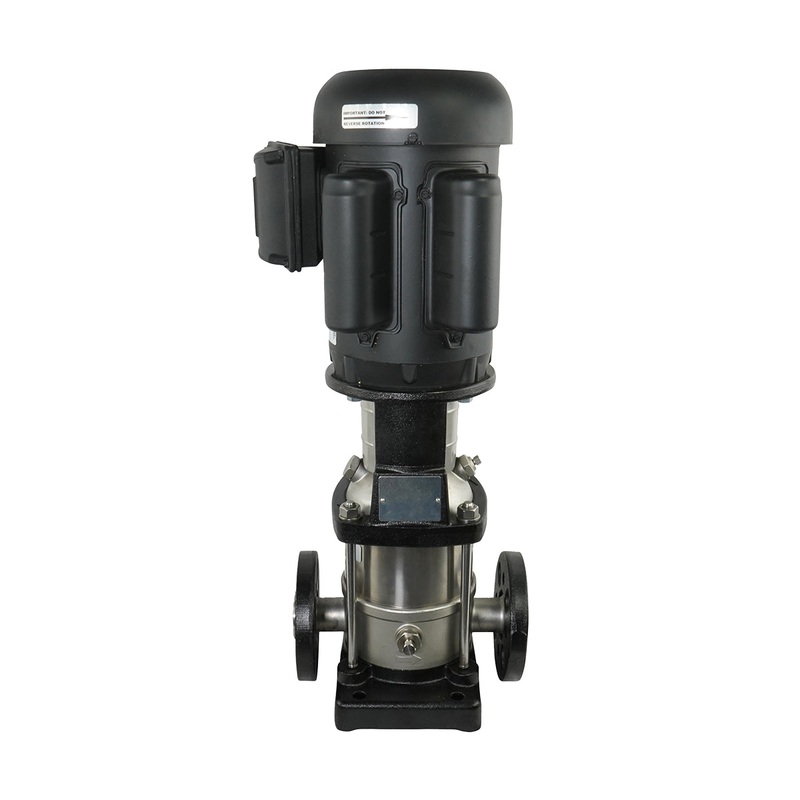
The V-Flow Pump NV12-10S is a high-efficiency, ten-stage vertical booster pump designed for industrial, commercial, and agricultural applications. Its vertical, in-line design saves valuable floor space while delivering reliable, consistent performance in demanding environments.
Motor Options
-
Single-Phase Motor
- Ideal for locations without three-phase power
- Provides the same flow capacity and pressure as the three-phase model
- Slightly lower electrical efficiency and better suited for lighter duty cycles
-
Three-Phase Motor
- Standard for commercial and industrial sites
- Higher electrical efficiency and smoother continuous operation
This pump is well-suited for reverse osmosis, water treatment, irrigation, sprinkler systems, hot and cold water circulation, and general water boosting applications.
The V-Flow Pump NV12-10S combines precision engineering with dependable performance, making it a trusted choice for a wide range of water handling needs.
###
V-Flow Pump NV12-10S
Vertical Multistage Booster Pump 304 Stainless Steel
| Technical Specifications |
| Rated Flow |
12 GPM |
| Stages |
10 |
| Max Working Pressure |
362 PSI |
| Max Inlet Pressure |
150 PSI |
| Motor Power |
2 HP |
| Motor Phase / Frequency |
1PH or 3PH / 60Hz |
| Motor Frame |
56C |
| Motor Enclosure |
T – TEFC |
| Pump Length (Flanged) |
17.01 in |
| Weight (Flanged) |
40 lbs |
###
Construction & Design Features (304 Stainless Steel Model)
| Component |
Material (304 SS Models) |
| Motor Bracket |
Cast Iron |
| Pump Head |
304 Stainless Steel |
| Impeller |
304 Stainless Steel |
| Diffuser |
304 Stainless Steel |
| Neck Ring |
Teflon |
| Shaft |
431 Stainless Steel |
| Casing |
304 Stainless Steel |
| O-Ring |
EPDM |
| Pump Base |
304 Stainless Steel |
| Base Plate |
Cast Iron |
| Mechanical Seal |
Silicon Carbide/Silicon Carbide/EPDM |
###
Installation Manual
Installation Instructions for V-Flow Pump NV12-10S
- Preparation:
- Inspect the pump and motor for any visible damage during shipping. Report any damage to the carrier or dealer immediately.
- Ensure the installation site is level, stable, and provides adequate space and ventilation for motor cooling and servicing.
- Verify that the pump model matches the system requirements and intended application.
- Mounting the Pump:
- Secure the pump base to a solid, flat surface to minimize vibrations during operation.
- Align and support the suction and discharge piping to prevent undue strain on the pump.
- Install isolation valves on both the suction and discharge sides for easy maintenance and servicing.
- Piping Connections:
- Ensure piping matches the pumps 2″ ANSI 150# flanged connections.
- Install appropriate gaskets to prevent leaks and ensure unobstructed flow.
- Remove any protective covers or caps from the flanges before installation.
- For hot water systems, include a bleed valve in the discharge line to relieve pressure during maintenance.
- Electrical Connection:
- Have a certified electrician verify that the electrical supply matches the motors specifications (2 HP, single-phase).
- Ensure proper motor wiring and confirm counterclockwise rotation when viewed from the motors rear.
- If rotation is incorrect, consult the motors wiring instructions for correction.
- Priming the Pump:
- Remove the fill plug and use a funnel to fill the pump casing with water.
- Open the vent plug to allow air to escape as the pump fills with water.
- Re-seal the vent plug and fill plug once a steady stream of water flows from the vent.
- Initial Testing:
- Open the suction valve fully and partially open the discharge valve.
- Apply power to the motor and check for smooth operation without unusual noise or vibration.
- Gradually open the discharge valve to achieve desired operating conditions.
- Safety Precautions:
- Never operate the pump without water to avoid damage to internal components.
- Replace coupling guards after installation to ensure operator safety.
- Ensure the pump is properly grounded and all connections are secure before starting.


Reviews
There are no reviews yet.